Wednesday, 25 December 2019

SLES 12 /boot on LVM

This post is a follow up to my previous post SLES 15 /boot on LVM. If you haven't read that post before go read before you continue. 

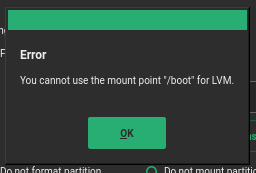
If you are trying the same trick in SLES 12, you will realize that you are not allowed to mount any logical volume into /boot


But this is just an installer limitation, we can still put /boot into LVM just that we have few more steps to do. For now, just put the boot logical volume into /newboot. Your logical volume should look like the following. 


Proceed with the installation and after the installation is completed, make sure you can boot into your SLES 12. 

Once you it boots up, move /boot into /newboot 

# mv /boot/* /newboot
# umount /newboot

Update your /etc/fstab to mount /dev/system/boot into /boot 


Now you can mount your LVM based /boot partition
# mount -a

Reinstall grub and update grub config

# grub2-install  /dev/sda
# grub2-mkconfig  -o  /boot/grub2/grub.cfg

Reboot the system and now you will have SLES 12 /boot on LVM 


Happy Holiday and as usual cheers!!!


Tuesday, 24 December 2019

SLES 15 LVM + XFS Without Separate /boot Partition

GRUB2 allow booting from LVM partition, however I haven't see any documentation on how to setup SLES 15 using LVM + XFS root partition without separate /boot partition. You can even put /boot as one of the logical volume.

When separate /boot partition is not created, we will need to create small partition with BIOS boot flag and once this BIOS boot partition is created, you can setup the remaining disk as LVM partition and setup your volume group and logical volumes as usual.   

During the installation, choose "Expert Partitioner" > "Start with Existing Partitions".


Select your disk and "Create New Partition Table" > "GPT"


Select "Partitions" tab and choose "Add Partition"


Choose "Custom Size" then enter "8 MiB" as the size. The Role of this partition should be "Raw Volume (unformatted)"

Select BIOS Boot as Partition ID


Create another partition as LVM partition and setup your LVM as usual. In this tutorial I am creating "system" VG with "boot", "root", and "swap" LV.


Proceed with the installation as usual. Once the installation complete, you should have SLES 15 with all mount points inside LVM + XFS. 


That's all for today notes. Have fun trying!!!

Cheers


Wednesday, 13 November 2019

RHEL 5 - VMware - Mouse Not Working

When installing RHEL 5 on VMware / ESX, somehow generated /etc/X11/xorg.conf does not contain mouse driver.

Just update the /etc/X11/xorg.conf as follow (all the new lines are highlighted):

# Start of Xorg configuration 

Section "ServerLayout"
        Identifier     "Default Layout"
        Screen      0  "Screen0" 0 0
        InputDevice    "Keyboard0" "CoreKeyboard"
        InputDevice     "Mouse0" "CorePointer"
EndSection

Section "InputDevice"
        Identifier  "Keyboard0"
        Driver      "kbd"
        Option      "XkbModel" "pc105"
        Option      "XkbLayout" "us"
EndSection

Section "InputDevice"
        Identifier      "Mouse0"
        Driver          "vmmouse"
        Option "Device" "/dev/input/mice"
        Option "Name" "Mouse on VMware"
EndSection

Section "Device"
        Identifier  "Videocard0"
        Driver      "vmware"
EndSection

Section "Screen"
        Identifier "Screen0"
        Device     "Videocard0"
        DefaultDepth     24
        SubSection "Display"
                Viewport   0 0
                Depth     24
        EndSubSection
EndSection

# End of Xorg configuration

You can reload the display or restart the VM after that and your RHEL 5 will have mouse pointer then. 

Cheers


Tuesday, 10 September 2019

Troubleshooting cronjob

Plenty of times, perfectly working scripts can't seem to be executed properly when configured as cronjob. The annoying part is cron seem to only log the time when the script is executed and nothing else.

The solution is actually rather simple, just add the following lines to the end of your script
>/tmp/cronscript.log 2>&1

After the script is executed, you will be able to see the error messages

Hints: Most of the time, cron job is just missing the $PATH environment variable.

Cheers

Sunday, 8 September 2019

putty and ugly ncurses border

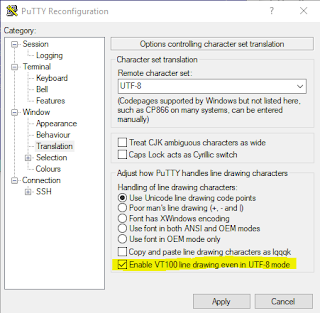
ncurses borders always appear nicely when logging in from any Linux system, however a lot of our customer is using putty on windows. When loading ncurses application like YasT, ncurses border usually appear as characters (l, q, k, x, m and j) and the nice ncurses will looks ugly. 

The fixed is actually quite simple, in putty configuration make sure you check "Enable VT100 line drawing even in UTF-8 mode"


Reconnect your ssh session and your ncurses border will be beautiful again. 

Cheers!!!


Sunday, 18 August 2019

Cleanup journalctl logs

Hi all,

Been a while since my last writing. If you are provisioning small server and notice that you are running out of space, the easiest thing to clean up are the journal logs. You can clear it based on time or size.

Anyway below are the commands:

# journalctl --vacuum-time=7d

This command will clean up 7 the logs until the last 7 days

# journalctl --vacuum-size=100M

This will keep only the last 100M of journalctl logs.

See you next time

Monday, 17 June 2019

Installing RHEL 7.6 on Hyper-V Generation 2

I never expected to write anything on Hyper-V and here I am typing this post. 

Anyway I was trying to install RHEL 7.6 as generation 2 Hyper-V virtual machine and for some reason, it refused to boot the RHEL 7.6 boot ISO image by default. I check multiple times that the ISO image is correct and boot order is set to boot from the ISO image. 

Based on Microsoft Documentation on Guest OS Support, RHEL 7 is supported as generation 2 virtual machine.  

Apparently the solution to this is pretty simple. To install RHEL 7.6 from boot image, you just need to un-check the Secure Boot as seen below. 


Reset the Virtual Machine again, and you can start installing your RHEL 7.6. I tried this with RHEL 7.6 but it should work with all RHEL 7.x versions. 

Cheers

Sunday, 9 June 2019

pfSense and scp

pfSense and scp doesn't play nice. When you try to scp to admin@pfsense.hostname you will likely encounter the error "Illegal option -[X]"

The solution to this is rather simple too, when running scp to pfSense, just use the root account. 

Cheers

Thursday, 11 April 2019

Setup MySQL 8 Community using Ansible with own password

Random password is annoying for automation so here is how I setup MySQL 8 Community using ansible.

Here is the link to my ansible-playbook
mysql.yml

Adjust the password, current password is: C0mpl3XP@s5

Run the playbook
# ansible-playbook mysql.yml

Assuming your host is called mysql like mine, you will get MySQL 8 Community installed in your openSUSE in time.